
History and Definition
Vitrification was first investigated and described in the 19th century1. Luyet, the founder of cryobiology, first recognized the potential of achieving an ice-free, structurally arrested state for cryopreservation2,3. Subsequently, it was recognized that vitrification would be a better technique for the preservation of living cells and tissues than would solutions that crystallize and hence damage cells during cooling and warming.
Vitrification can be defined as a physical process by which a highly concentrated solution of cryoprotectant solidifies into a glassy vitrified state from the liquid phase by an extreme elevation in the viscosity while cooling at a low temperature. The solid which is called glass retains the normal molecular and ionic distribution of liquid state and can be considered to be an extremely viscous supercooled liquid4. The process avoids intracellular and extracellular ice formation5. It thus avoids the possible damage which can be caused by intracellular ice formation and the osmotic effects related to extracellular ice formation. Equally important, it also completely avoids ice crystal formation in cryopreserved cells during the thawing process.
Vitrification of water inside cells can be achieved by:
- Increasing the speed of temperature conduction; and
- Increasing the concentration of cryoprotectant.
Technique:
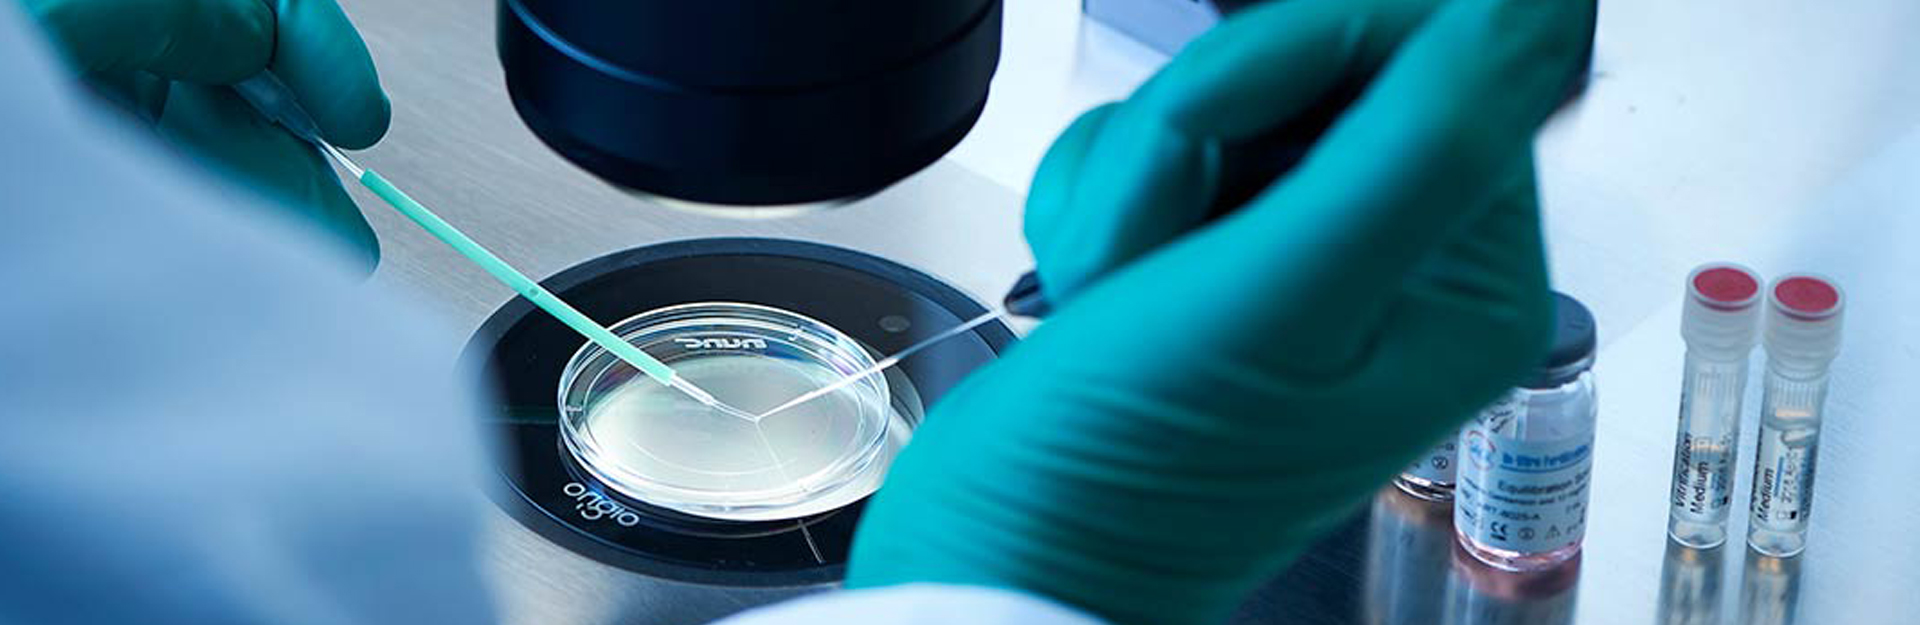
Zygotes, cleavage stage embryos and blastocysts
Vitrifying:
Materials (expendables): conical tubes, tissue culture dish, organ culture dish, 5 and 10 ml disposable pipettes, pulled pipettes-inner diameter just larger than cells being cryopresered, 0.2µm filter, 20µl pipette tips, cryo goblet, cryo cane, cryo sleeve, 1cm3 syringe, ”pulled straw” with an inner diameter of approximately 200 – 230µm, syringe pulled straw connector.
Equipment: pipetting devices, laminar flow hood, dissecting microscope with lighted base, labelling device, timer, heat sealer, forceps, liquid nitrogen Dewar, liquid nitrogen storage canister with lock and alarm, safety goggles and cryo gloes
Cryo-solutions:
Wash solution:
HEPES buffered medium + 12% (w/v) protein source (WASH)
Equilibration solution: HEPES buffered medium + 7.5% (v/v) ethylene glycol + 7.5% DMSO + 12% (w/v) protein source. (ES)
Vitrification solution: HEPES buffered medium + 15% (v/v) ethylene glycol + 15% DMSO + 0.5 M sucrose + 12% (w/v) protein source. (VS)
Procedure:
- Vitrification media should be prepared a day prior to use. All tubes, syringes and filters should be rinsed prior to use. Embryo culture dish should be prepared 4 hours before use and allowed to equilibrate in the CO2 incubator.
- All solutions should be warmed to room temperature. Ensure that all solutions are mixed and homogenous.
- Prepare the culture dish with patient identification and written indication of 20µl drop placements. Also label the pulled straw with patient identifiers.
- Dispense 20µl drops of WASH (one drop), and ES (one drop) onto the culture dish.
- Select zygotes/embryos for vitrification. Using a pulled-pipette and the least amount of media carry over, transfer cells (maximum two at a time) from culture media into WASH drop for one minute.
- Using the pulled pipette tip, transfer embryos/zygotes into the top of ES drop. The cells will shrink and sink to bottom of the drop. They will however gradually return to there original size. Embryos are left in this drop for 15 minutes or until they reexpand to their original size.
- During this equilibration step, dispense 4 drops of vitrification solution (20 µl each).
- Transfer embryos from ES to VS1. While observing the embryos microscopically count for 5 seconds.
- Transfer embryos to VS2 for 5 seconds.
- Transfer embryos to VS3 for 10 seconds
- Finally transfer embryos to VS4. The goal at this step is to load the pulled straw, seal it and plunge it in liquid nitrogen within a 90 seconds interval.
- To load the pulled straw, aspirate VS4 into straw to the first line (closest to the fine pulled tip), aspirate VS4 and embryos with fluid meniscus reaching the second line, aspirate additional VS4 with fluid reaching the third line.
- Heat seal the narrow end of the straw just below the first mark, and then above the fourth mark.
- Hold the sealed straw with forceps and immerse, while swirling, directly into the liquid nitrogen.
Warming:
Materials(expendables): conical tubes, tissue culture dish, organ culture dish, 5 and 10 ml disposable pipettes, pulled pipettes-inner diameter just larger than cells being cryopresered, 0.2µm filter, 20µl pipette tips, 1cm3 syringe, ”pulled straw” with an inner diameter of approximately 200 – 230µm, syringe pulled straw connector, paper tissue or sterile gauze.
Equipment: pipetting devices, laminar flow hood, dissecting microscope with lighted base, labelling device, timer, forceps, thermometer, water bath, scissors, liquid nitrogen Dewar, safety goggles and cryo gloves.
Warming: Warming solutions
Initial warming solution= HEPES-buffered medium+1.0 M sucrose+ 12% (w/v) protein source (IWS)
Dilution solution= HEPES-buffered medium+ 0.5 M sucrose+ 12% (w/v) protein source (DS)
Wash solution= HEPES-buffered medium+12% (w/v) protein source (WASH)
Procedure:
- All solutions should be prepared a day prior to use. All tubes, syringes and filters should be rinsed prior to use. Embryo culture dish should be prepared 4 hours before use and allowed to equilibrate in the CO2 incubator.
- All solutions should be warmed to room temperature. Ensure that all solutions are mixed and homogenous.
- Prepare the culture dish with patient identification and written indication of 20µl drop placements.
- Dispense 20µl drops of IWS (one drop), and DS (two drop) onto the culture dish.
- Select the straw of zygotes/embryos to be warmed and rappidlt transfer from the liquid nitrogen storage tank to the liquid nitrogen filled Dewar. Place the Dewar close to 37 degree Celsius water bath.
Begin the warming process:
- Remove the straw from the liquid nitrogen and immediately and completely submerge in the water bath while swirling the straw for 3-5 seconds.
- Remove from the water bath and wipe dry using a tissue or sterile gauze.
- Using scissors cut the straw at the end near the fourth mark at the large end of the straw.
- Attach to the pippetting device
- Position the straw tip over the culture dish and cut the straw between the first and second mark keeping close to first mark.
- Dispense the contents of the straw as a small drop.
- Rinse the pulled straw with the IWS by aspiration upto the 3rd mark.
- Dispense these contents as a small drop near the initial drop and merge the two drops with the dragging motion of the pulled straw. Set the timer for one minute.
- After one minute, transfer the zygotes/embryos to the IWS drop and leave for one minute.
- When the timer rings, transfer the zygotes/embryos to the bottom of DS1 drop for 2 minutes and then ds2 drop for another 2 minutes. During this DS2 exposure dispense 3 20µl drops of WS.
- Using a pulled pipette, transfer zygotes/embryos through these wash drops, with two minutes exposure in each.
- In the final WASH drop, check and record survival and development.
- Finally transfer the zygotes/embryos in the culture media and place in the incubator.
Free Second Opinion
This message will be confidential